If a backpack doesn’t fit properly, even a thoughtful design can feel awkward. That’s one of the most common pieces of feedback we hear — not because the design isn’t working, but because it hasn’t quite been adjusted in the right way yet.
The good news? Small changes in how you fit your backpack can make a huge difference.
With Altered Freedom Woman'sBack backpack, the goal isn’t just to wear it — it’s to let the design do the work. That means allowing the hips to carry most of the load, while the upper straps stabilise the pack and keep pressure away from the side you’re protecting.
Before You Start
First, make sure you’ve chosen the correct version of the backpack.
If your affected side is your left side, shoulder, armpit, or arm, choose the left-affected version
If your right side needs protection, choose the right-affected version
Step-by-Step Fitting Guide
Getting the order right is key — and it may be a little different from what you’re used to.
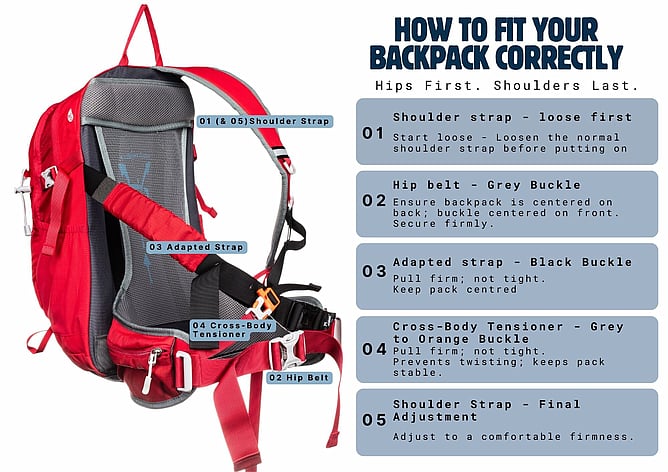
Step 1: Start with the shoulder strap loose
Put the backpack on with the standard shoulder strap reasonably loose. This allows you to position the pack correctly before tightening anything.
Step 2: Secure the hip belt first
Fasten the waist/hip belt (grey buckle), ensuring it is centred on your body and the backpack is sitting centrally on your back.
This is the most important step.
Your hips should carry around 70–80% of the load, so really allow the weight to settle here. When this is right, everything else becomes easier.
Step 3: Adjust the adapted strap
Secure the adapted strap (black buckle) and pull until it feels firm but not restrictive.
At this point, check that the backpack still feels centred. If it has shifted, gently guide it back into position and retighten.
You should feel the top of the backpack lightly resting against your shoulder blade on the affected side — not pressing, just present.
Step 4: Secure the cross-body tensioner
Fasten the cross-body tensioner (small grey-to-orange buckle) and pull until it feels supportive and comfortable.
Again, check that the pack remains centred. This step helps prevent the pack from twisting or pulling to one side.
Step 5: Adjust the shoulder strap last
Lastly, adjust the standard shoulder strap to a comfortable firmness.
This strap will take some of the remaining load, but it shouldn’t feel like it’s carrying the weight of the pack on its own.
Together with the adapted strap and cross-body tensioner, it helps share the load and keep the backpack stable — while allowing your hips to remain the primary support.
Your shoulders should feel supported, but relatively free — not under strain.
Packing Matters Too
How you pack your bag plays a big role in how it feels.
Keep heavier items low and close to your back, near your hips
Place lighter items toward the top and outer sections
Check balance by lifting the bag from the top handle — if it swings to one side, it likely needs a small repack
A well-balanced pack helps prevent twisting and keeps everything feeling steady.
Final Check: Move With It
Once everything is adjusted, take a short walk — even just around the house or down the street.
Does it stay centred?
Does it feel stable when you turn or bend?
Are your shoulders relatively free?
If it starts to pull slightly to one side, don’t overhaul everything. Small adjustments make the biggest difference. Often tightening one strap means slightly easing another.
A Real Note of Encouragement
If your backpack doesn’t feel quite right straight away, you’re not doing it wrong.
This fitting process is a little different from a standard backpack — and it often comes down to one or two small adjustments rather than a major change.
We’ve seen customers go from “this feels off” to completing a 10km walk with a completely stable pack, simply by adjusting the order and balance of the fit.
You’re likely closer than you think.
If you’re unsure, we’re always here to help. Sometimes a quick conversation is all it takes to turn “I’m not sure” into “that feels so much better.”
Need help getting the fit right? Get in touch and we’ll talk you through it.